There is nothing quite like the aroma of toasted oats and melting chocolate wafting through the kitchen on a slow Saturday morning. These chocolate almond oat waffles are designed to be the centerpiece of your brunch table, offering a sophisticated twist on a classic comfort food. By combining the rustic, hearty texture of ground oats with the richness of almond butter, we create a waffle that is as nutritionally dense as it is delicious.
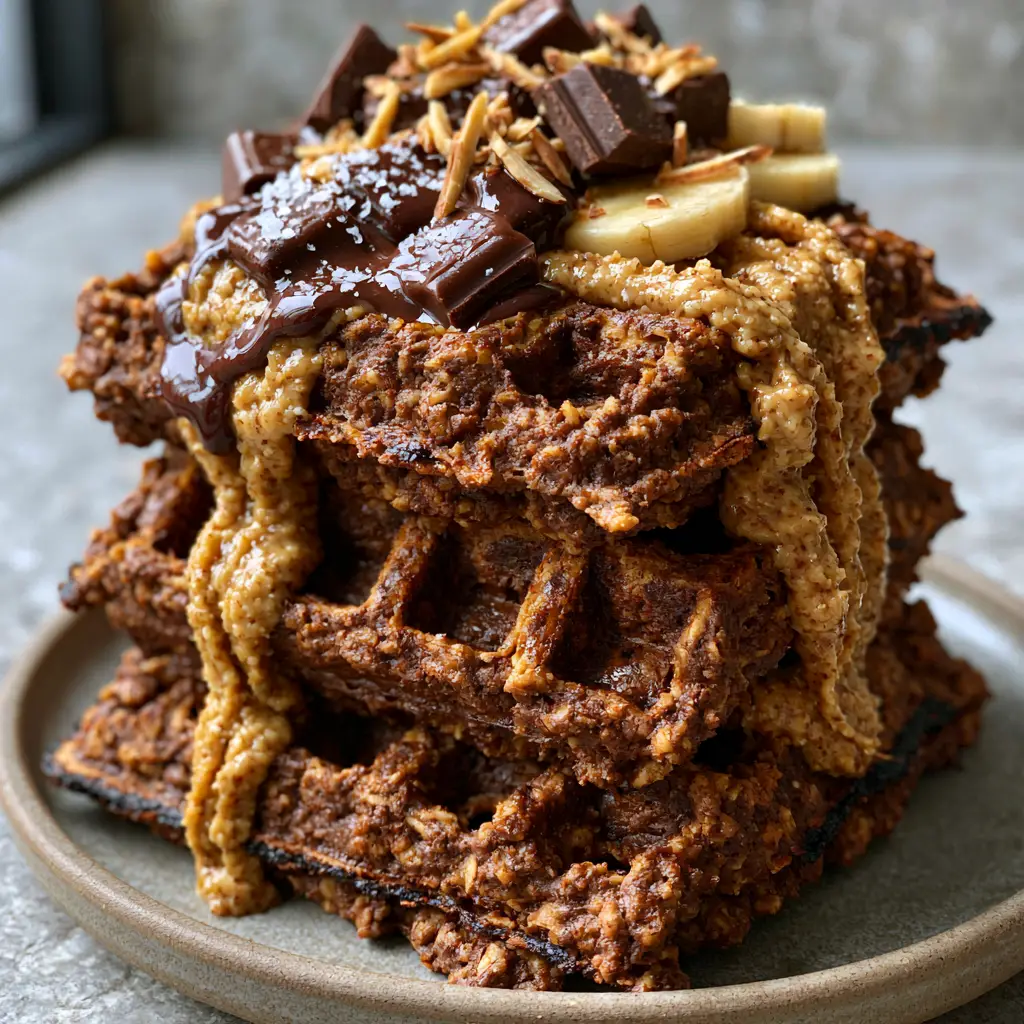
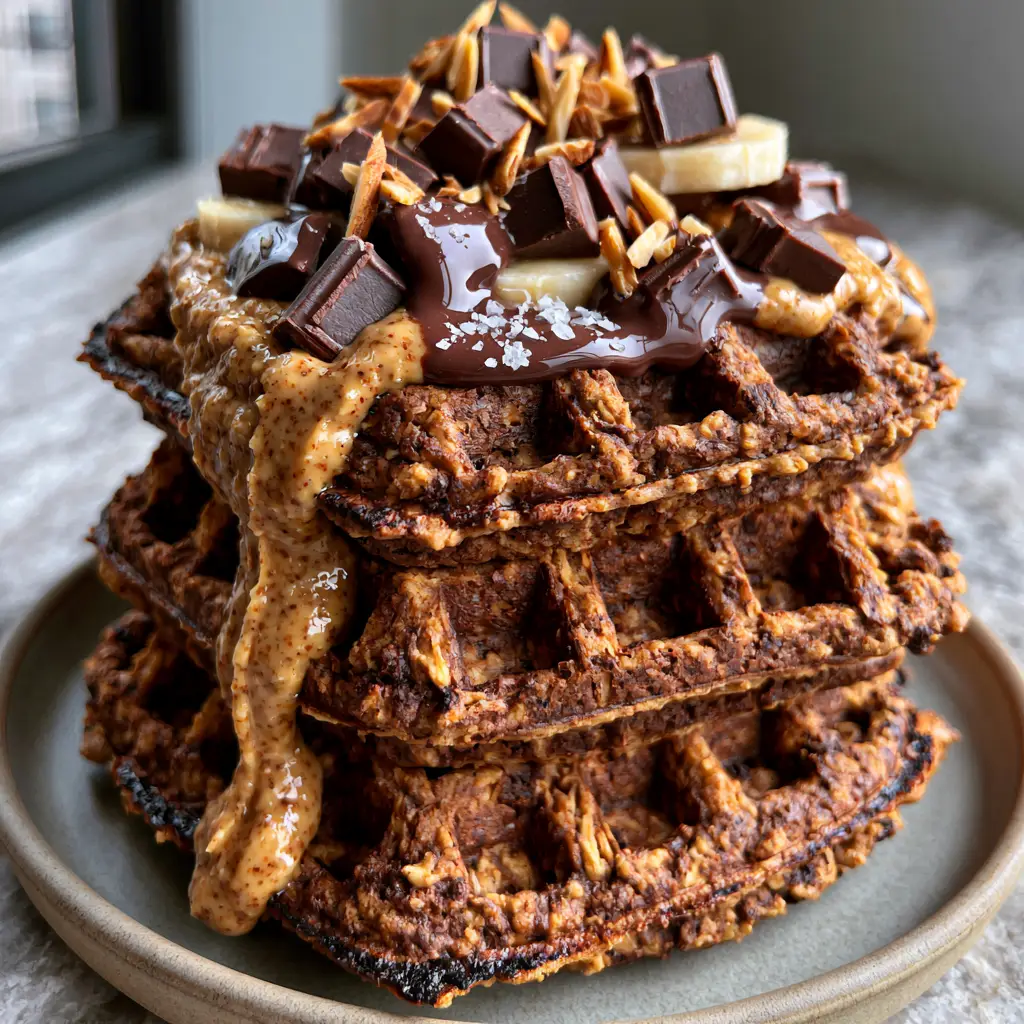
Visually, this dish is a masterpiece of textures and tones. Imagine a stack of three thick, golden-brown waffles, boasting deep, crispy square pockets that are just waiting to be filled with toppings. The edges carry a slight, intentional char that provides a satisfying crunch, contrasting beautifully with the tender, oat-flecked interior. This isn’t just a meal; it’s a sensory experience that rivals any high-end bistro offering.
In this guide, we will explore the culinary science behind achieving that perfect waffle “snap,” the importance of ingredient temperature, and how to layer toppings for maximum visual and flavor impact. Whether you are a seasoned home cook or a weekend kitchen warrior, these waffles will become your new gold standard for breakfast excellence.
Why You Will Crave These Chocolate Almond Oat Waffles
- Unrivaled Texture: The use of pulsed whole oats provides a visible, rustic texture and a “nutty” bite that traditional flour simply cannot replicate.
- Crispy Pocket Architecture: Designed specifically for deep-well waffle irons, these waffles feature high ridges that achieve a slight char while keeping the center fluffy.
- The Melt Factor: The inclusion of hand-chopped dark chocolate chunks ensures puddles of molten cocoa in every single bite.
- Balanced Flavor Profile: The richness of the creamy almond butter drizzle is perfectly cut by a finishing touch of flaky sea salt and fresh banana slices.
- Natural Wholesomeness: Using oats and almond flour makes these an excellent choice for those seeking gluten-free snack recipes or a more sustaining morning meal.
Wholesome Pantry Staples for the Perfect Oat Batter
Old-Fashioned Rolled Oats (2.5 cups / 225g): These are the backbone of our recipe. We pulse them briefly to create a coarse “meal” rather than a fine powder, ensuring that the waffles have that signature visible oat texture described in our visual blueprint.
Almond Flour (0.5 cup / 50g): This adds a delicate crumb and a boost of healthy fats. It works in tandem with the oats to create a structural integrity that prevents the waffles from becoming soggy under the weight of the toppings.
Baking Powder (1 tbsp / 12g): This is our “invisible” lifting agent. It reacts with the heat of the waffle iron to create thousands of tiny air bubbles, resulting in a thick, airy stack of three waffles.
Creamy Almond Butter (0.25 cup / 60ml for batter + extra for drizzle): Inside the batter, it provides moisture and flavor. As a topping, its heavy, thick viscosity allows it to cascade over the sides and fill the crevices as seen in the final presentation.
Dark Chocolate Chunks (0.5 cup / 90g): We prefer semi-sweet chunks over chips. Their irregular sizes lead to larger, more luxurious pools of melting chocolate that catch the light on the plate.
Egg Whites & Yolks (2 large): By separating and whipping the whites, we incorporate mechanical leavening. This is the secret to getting those deep, crispy square pockets to stand tall and firm.
Essential Kitchen Tools for Waffle Success
To achieve the specific “handheld smartphone photo” aesthetic of a professional stack, you need the right gear. A high-quality, deep-pocket Belgian waffle iron is non-negotiable for those thick ridges. You will also need a high-speed blender or food processor to pulse the oats to the correct consistency.
A matte ceramic plate is recommended for serving. Unlike glossy plates, matte surfaces do not create harsh glares under diffused side-lighting, allowing the “heavy, thick drizzle” of almond butter to be the star of the shot. Finally, a sharp chef’s knife is essential for creating those thin, uniform banana slices and clean almond slivers.
The Step-by-Step Path to Crispy Waffle Perfection
Preparing the Signature Oat Base
Start by placing your rolled oats into a blender. Pulse 5-7 times until they look like a coarse sand; you want to see distinct fragments of oats to ensure the final waffle has visible texture. In a large bowl, whisk this oat meal with the almond flour, baking powder, and a pinch of fine salt.
Mixing the Wet Emulsion
In a separate vessel, whisk together the almond milk (1.25 cups / 300ml), melted coconut oil (3 tbsp / 45ml), almond butter, and egg yolks. The coconut oil is crucial for achieving that “slight char” on the edges, as it has a higher smoke point than butter and promotes rapid browning.
Folding for Fluffiness
Gently fold the wet ingredients into the dry. Do not overmix; a few lumps are perfectly fine and actually help with the structural texture. Fold in half of your dark chocolate chunks now, saving the rest for the topping. If you enjoy experimenting with different textures, you might find this process similar to prepping our golden butter waffles.
Achieving the Char and Crunch
Preheat your waffle iron to its highest setting. Lightly brush the plates with oil. Pour the batter in, ensuring it reaches the edges. Cook until the steam almost stops escaping—this is your sensory cue that the moisture has evaporated and the “golden-brown” crust has formed. Look for those deep, crispy square pockets to be firm to the touch.
Assembling the Visual Masterpiece
Once you have your stack of three waffles, the assembly is where the culinary forensics come into play. Place the waffles on your matte ceramic plate. Immediately top with the remaining dark chocolate chunks so the residual heat begins the melting process.
Take your creamy almond butter and, using a spoon, create a “heavy, thick drizzle” that starts at the center and cascades over the sides. Arrange the thin banana slices and toasted almond slivers artistically around the top. The final, critical step is a generous sprinkle of flaky sea salt. The salt crystals should be visible on the melting chocolate, providing a sharp contrast to the sweetness.
Expert Tips for Success
- The Steam Cue: Never open your waffle iron while steam is still billowing out. The steam indicates the center is still wet; once it slows to a faint wisp, your waffles are ready.
- Toast Your Almonds: Always toast your almond slivers in a dry pan for 2-3 minutes before topping. This enhances the aroma and ensures the “toasted” descriptor in our blueprint is fully realized.
- Keep it Warm: If cooking for a crowd, place finished waffles on a wire rack in a 200°F (95°C) oven. Do not stack them in the oven, or they will lose their crispy edges.
- Viscosity Check: If your almond butter is too thick to drizzle, microwave it for 10 seconds. It should be “heavy” but fluid enough to fill the crevices.
Storage, Reheating, and Freezing
These waffles are excellent for meal prep. Allow them to cool completely on a wire rack before storing. In the refrigerator, they will stay fresh in an airtight container for up to 3 days. For longer storage, freeze them in a single layer before transferring to a freezer bag; they will last for 2 months.
To reheat and maintain that “deep, crispy” texture, avoid the microwave. Instead, use a toaster or a toaster oven. This revitalizes the charred edges and ensures the oat texture remains firm rather than rubbery. This makes them a much more convenient option than something like mango strawberry sunset cupcakes for a quick Tuesday morning.
What to Serve With This
While these chocolate almond oat waffles are a complete meal on their own, they pair beautifully with a side of fresh fruit or a high-protein accompaniment. Consider a side of Greek yogurt or even a light salad if you’re serving these as part of a larger brunch spread. If you’re looking for a savory contrast later in the day, these flavors surprisingly complement a light asian ramen coleslaw or a fresh mediterranean quinoa salad.
Frequently Asked Questions
Yes. Replace the 2 eggs with flax eggs (2 tbsp ground flax mixed with 6 tbsp water) and ensure your dark chocolate chunks are dairy-free. Note that they may be slightly less ‘fluffy’ without the whipped egg whites.
Yes, but you will lose some of the rustic, visible texture found in the visual blueprint. If using store-bought, add 2 tablespoons of whole oats to the batter to maintain the character.
The key is the coconut oil in the batter and ensuring the steam has mostly stopped before opening the iron. Also, cooling them on a wire rack rather than a plate prevents steam from softening the bottom.
Oats provide a chewy, hearty structure, while almond flour adds moisture and a delicate crumb. This combination creates a sturdy waffle that can hold heavy toppings like almond butter and chocolate without collapsing.
The Ultimate Chocolate Almond Oat Waffle Recipe
Chocolate Almond Oat Waffles: The Ultimate Crispy and Wholesome Breakfast
Ingredients
Equipment
Method
- Pulse the rolled oats in a blender until they reach a coarse, sandy texture with visible oat fragments.
- Whisk the pulsed oats, almond flour, baking powder, and a pinch of salt in a large bowl.
- In a separate bowl, whisk egg yolks, almond milk, melted coconut oil, and almond butter until smooth.
- In a clean bowl, beat egg whites until stiff peaks form, then gently fold into the main batter for extra lift.
- Pour batter into a preheated, greased waffle iron. Cook until the steam stops and edges are golden-brown with a slight char.
- Stack three waffles. Top with chocolate chunks, a heavy almond butter drizzle, banana slices, and toasted almonds.
- Sprinkle with flaky sea salt over the melting chocolate and serve immediately.
Notes
Use old-fashioned oats rather than quick oats for a better rustic texture.
Closing & Call to Action
Mastering the chocolate almond oat waffles is about embracing the harmony of rustic ingredients and precise cooking techniques. The result is a breakfast that feels indulgent yet provides the sustained energy you need for the day. The visual appeal of the melting chocolate and the thick almond butter drizzle makes it a dish you’ll want to photograph before the first bite.
If you enjoyed this recipe, please leave a comment below and let us know how your crispy pockets turned out! Don’t forget to sign up for our newsletter for more culinary blueprints. You can also save this recipe to your breakfast board by following us on Pinterest.