There is nothing quite like the sight of a bubbling, golden-brown Zucchini and Cheese Casserole emerging from a hot oven. The way the sharp cheddar fuses with heavy cream to create a velvety sauce, while the toasted panko provides a rhythmic crunch, is a sensory experience every home cook deserves.
If you have ever struggled with a watery vegetable bake, this Zucchini and Cheese Casserole is the definitive solution to your culinary woes. By focusing on moisture control and flavor layering, we transform humble garden produce into a centerpiece-worthy side dish that rivals any steakhouse gratin.
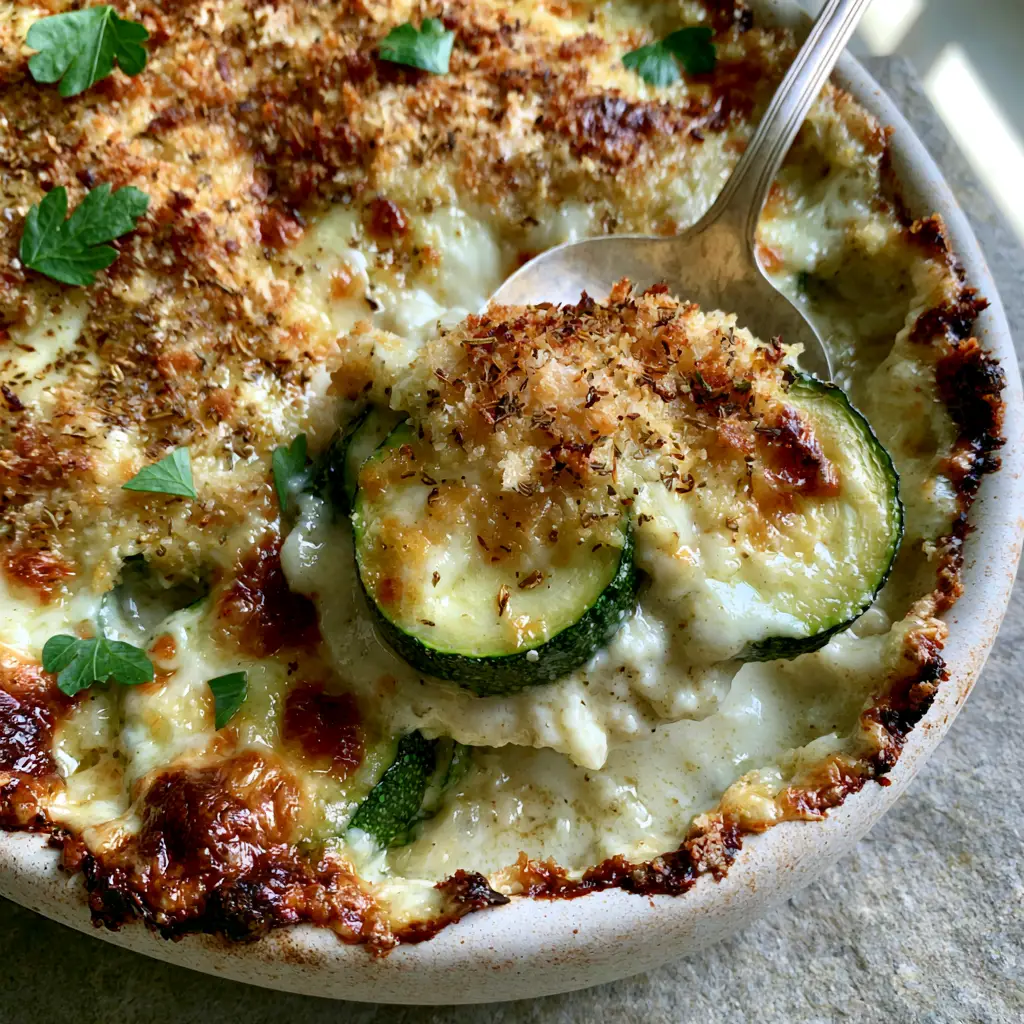
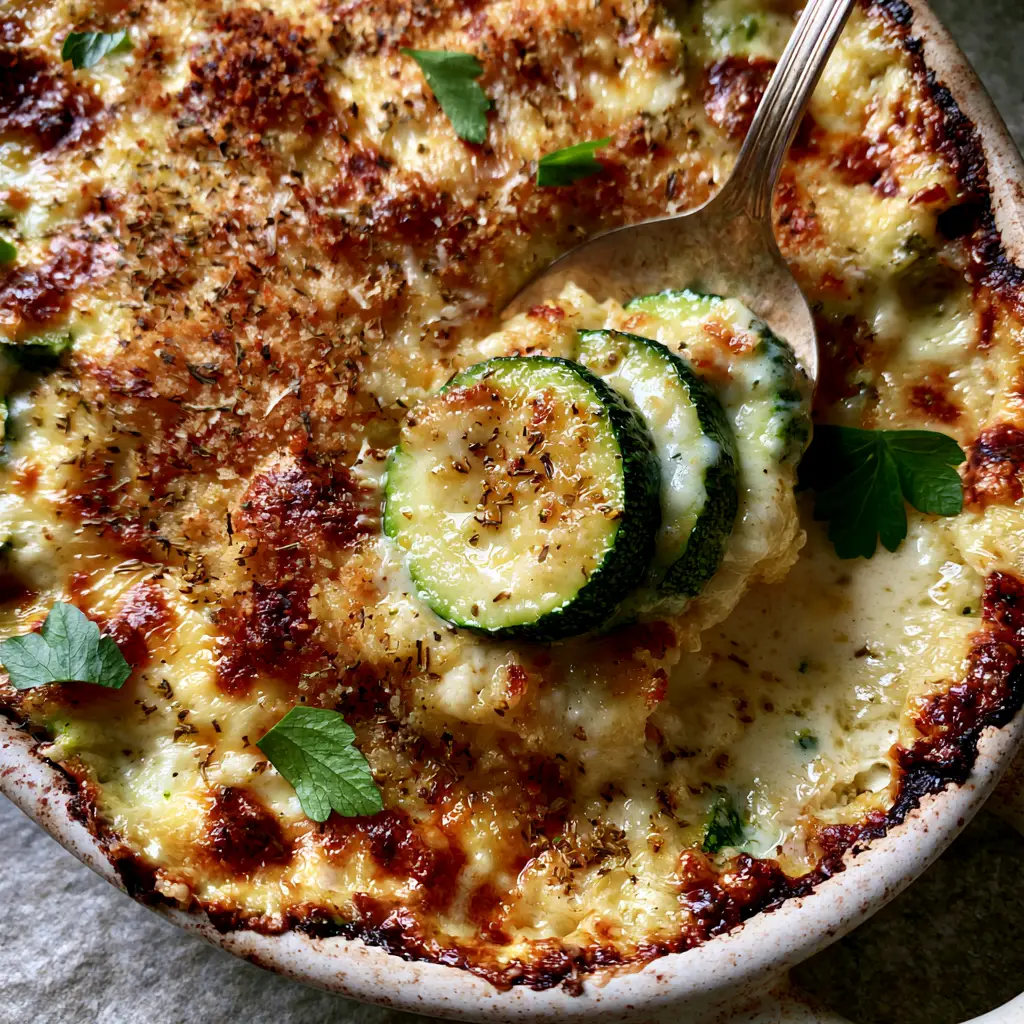
Imagine a silver serving spoon plunging into a rustic ceramic dish, lifting a portion of firm, perfectly circular zucchini slices. They are coated in a rich, white garlic cream sauce that clings to every curve, topped with a landscape of caramelized cheese bubbles and fresh parsley.
The Secrets to a Perfectly Structured Zucchini Bake
- Zero Wateriness: We utilize a professional salting technique to ensure the zucchini remains firm and the sauce stays thick and velvety.
- Textural Contrast: A dual-cheese crust featuring sharp cheddar for meltability and parmesan for a salty, golden-brown finish.
- Aromatic Depth: Infusing the heavy cream with smashed garlic cloves creates a sophisticated flavor profile that permeates every layer.
- The Panko Factor: Using toasted panko breadcrumbs ensures a stay-crisp topping that won’t turn soggy under the heat of the oven.
Essential Components for This Gourmet Vegetable Gratin
Firm Zucchini Rounds: You will need approximately 2 lbs (900g) of medium zucchini. Look for specimens that are heavy for their size with smooth, unblemished skin to ensure they hold their shape during the baking process.
Heavy Cream (36% Fat): 1.5 cups (360ml) of high-quality heavy cream forms the base of our sauce. The high fat content is essential for achieving that “velvety” texture described in the visual blueprint without needing a flour-based roux.
Sharp Cheddar Cheese: 2 cups (225g) of freshly grated sharp cheddar provides the primary flavor and that iconic orange-gold stretch. Pre-shredded cheese often contains potato starch which can interfere with the sauce’s smooth consistency.
Grated Parmesan Cheese: 0.5 cup (45g) of finely grated parmesan is mixed with the topping. Its lower moisture content helps create those beautiful caramelized cheese bubbles and a deeply savory crust.
Toasted Panko Breadcrumbs: 1 cup (60g) of panko offers a larger flake than traditional breadcrumbs. This is the secret to the golden-brown crust that shatters delightfully with every bite.
Fresh Garlic: 4 cloves of garlic, smashed and minced, are infused directly into the cream. This ensures a pungent, aromatic backbone that balances the richness of the dairy.
Dried Italian Herbs: 1 tbsp (4g) of a high-quality blend featuring oregano, basil, and thyme provides the herbal notes visible in the final toasted crust.
Fresh Flat-Leaf Parsley: A handful of finely chopped parsley is used as the final garnish. The bright green color provides a visual “pop” against the warm tones of the melted cheese.
The Culinary Toolkit: What You Will Need
To achieve the rustic, high-angle aesthetic of our visual blueprint, a matte-white ceramic baking dish (9×13 inch or 2.5-quart capacity) is ideal. The ceramic material provides even heat distribution, which is critical for those slightly charred, caramelized edges.
A mandoline slicer is highly recommended for achieving consistent, circular zucchini rounds. Uniform thickness ensures that every slice cooks at the same rate, preventing the frustration of having some mushy slices and some raw ones in the same bite.
You will also need a fine-mesh strainer or a clean kitchen towel for the moisture-wicking step. This “invisible” step is what separates a professional-grade Zucchini and Cheese Casserole from a standard home-style version.
The Forensic Guide to Mastering the Zucchini and Cheese Casserole
Phase 1: Prepping the Zucchini for Maximum Firmness
Start by slicing your zucchini into 1/4-inch (6mm) thick rounds. Place the rounds in a large colander and toss with 1 tsp (5g) of kosher salt, ensuring every slice is lightly coated.
Let the zucchini sit for at least 20-30 minutes. You will notice beads of moisture forming on the surface; this is the excess water that would otherwise turn your casserole into a soup.
Rinse the slices quickly under cold water to remove excess salt, then pat them completely dry between two layers of paper towels or a clean lint-free kitchen towel. Press down firmly to “wick” away every drop of moisture.
Phase 2: Crafting the Garlic-Infused Cream Base
In a small saucepan over medium-low heat, combine the 1.5 cups (360ml) of heavy cream and the minced garlic. Bring the mixture to a very gentle simmer—do not let it reach a rolling boil.
Allow the cream to reduce slightly for about 8-10 minutes. This concentrates the fats and the garlic flavor, ensuring the sauce is thick enough to coat the “silver serving spoon” as seen in our visual guide.
Season the cream with a pinch of black pepper and half of the dried Italian herbs. Set aside to cool slightly while you prepare the baking dish.
Phase 3: Layering and Achieving the Perfect Crust
Lightly grease your ceramic baking dish with butter or olive oil. Arrange the zucchini rounds in overlapping rows, creating a shingled effect that allows the cream to seep into every crevice.
Pour the garlic cream evenly over the zucchini. Sprinkle the 2 cups (225g) of sharp cheddar over the top, followed by the panko breadcrumbs and grated parmesan cheese.
Finish with the remaining dried Italian herbs. This layer is what will transform into the thick, golden-brown crust with visible herb flakes and caramelized bubbles after its time in the oven.
Phase 4: The Bake and the Broil
Preheat your oven to 400°F (200°C). Bake the casserole for 20-25 minutes until the cream is bubbling vigorously around the edges and the zucchini is tender but still offers a slight “bite.”
For the final visual touch, turn your broiler to high for 2-3 minutes. Watch closely! You are looking for the cheese to develop those signature dark-gold charred spots and for the panko to reach a deep, toasted tan.
Remove from the oven and let it rest for 5-10 minutes. This resting period is crucial as it allows the sauce to set, ensuring it remains velvety rather than runny when served.
Expert Tips for Success
- Temperature Control: Ensure your cream is at room temperature before heating to prevent it from curdling when it hits the heat.
- Cheese Selection: For an even deeper flavor, try a blend of extra-sharp white cheddar and Gruyère. If you enjoyed our baked zucchini parmesan, you will love the added richness here.
- Even Slicing: If you don’t have a mandoline, use a sharp chef’s knife and take your time. Consistency is the key to the “perfectly circular” look.
- Avoid Overcrowding: If your dish is too deep, the bottom layers may steam rather than bake. A wider, shallower dish is better for achieving a high ratio of crust to vegetable.
Creative Pairings: What to Serve With This Casserole
This Zucchini and Cheese Casserole is a versatile star. It acts as a cooling, creamy contrast to spicy proteins like our Thai fried pork or serves as a decadent side to a perfectly seared tuna steak.
For a vegetarian feast, pair it with a bright Mediterranean quinoa salad to balance the richness of the garlic cream. The acidity of the salad cuts through the heavy cream beautifully.
If you’re hosting a summer BBQ, this casserole is a great alternative to potato salad, especially when served alongside chicken taco bowls for a fusion-style spread.
Storage and Reheating Guidelines
To Store: Place leftovers in an airtight container and refrigerate for up to 3 days. Note that the panko topping will lose some of its initial crunch over time.
To Reheat: Avoid the microwave if possible, as it can make the zucchini rubbery. Instead, place a portion in a small oven-safe dish and bake at 350°F (175°C) for 10-12 minutes until the cheese is bubbling again.
Freezing: We do not recommend freezing this dish. The high moisture content of the zucchini and the delicate nature of the cream sauce often result in a broken, watery texture upon thawing.
Frequently Asked Questions
Yes, yellow summer squash works perfectly as a substitute or in combination with zucchini. They have similar moisture levels, so follow the same salting and drying steps.
No, there is no need to peel the zucchini. The skin helps the rounds hold their shape and provides a beautiful color contrast in the casserole.
The secret is to salt the sliced zucchini and let it sit for 20-30 minutes. This draws out excess moisture. Rinse and pat them completely dry before assembling to ensure a thick, velvety sauce.
A combination of sharp cheddar for flavor and melting, and parmesan for a salty, crispy crust is ideal. Sharp cheddar provides a better flavor profile than mild cheddar in a heavy cream sauce.
Soggy panko usually happens if there is too much steam trapped under the cheese. Ensure your zucchini is dry and don’t cover the dish with foil while baking to allow moisture to evaporate.
The Ultimate Zucchini and Cheese Casserole Recipe
Zucchini and Cheese Casserole with Garlic Cream and Toasted Panko
Ingredients
Equipment
Method
- Toss sliced zucchini with salt in a colander. Let sit for 20-30 minutes to release moisture.
- Rinse zucchini and pat extremely dry with kitchen towels. This ensures a thick, non-watery sauce.
- Simmer heavy cream and garlic in a saucepan for 8-10 minutes until slightly thickened. Season with pepper and half the herbs.
- Arrange zucchini in the baking dish, pour over garlic cream, and top with cheddar, panko, and parmesan.
- Bake at 400°F (200°C) for 20-25 minutes. Broil for 2 minutes at the end for caramelized cheese bubbles and a golden-brown crust.
Notes
Don't skip the salting step or the casserole will be watery.
Join the Amber Apron Community
We hope this Zucchini and Cheese Casserole becomes a staple in your kitchen! The combination of fresh garden zucchini and a decadent garlic cream sauce is truly hard to beat.
If you made this recipe, please leave a comment below and let us know how your crust turned out! Did you get those perfect caramelized bubbles?
Don’t forget to snap a photo and share it with us on Pinterest. Seeing your creations is the highlight of our day!