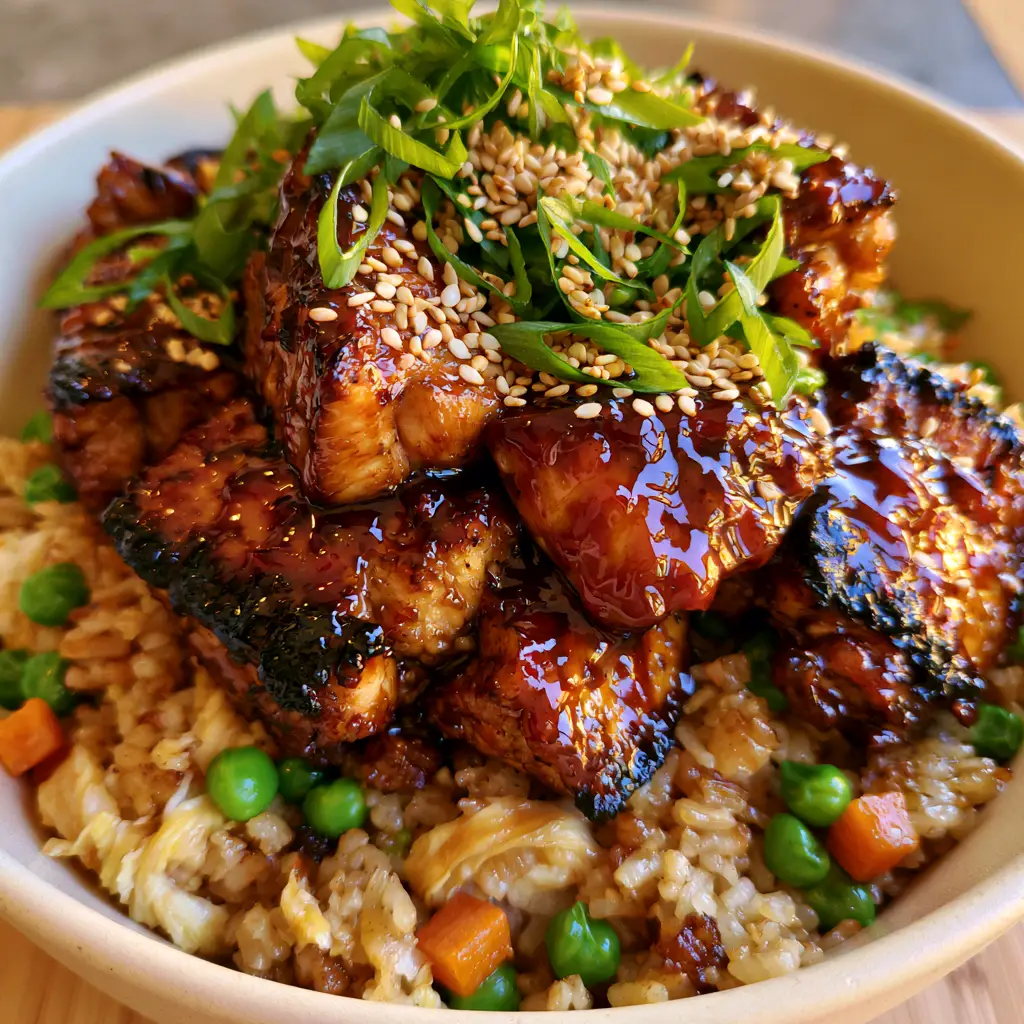
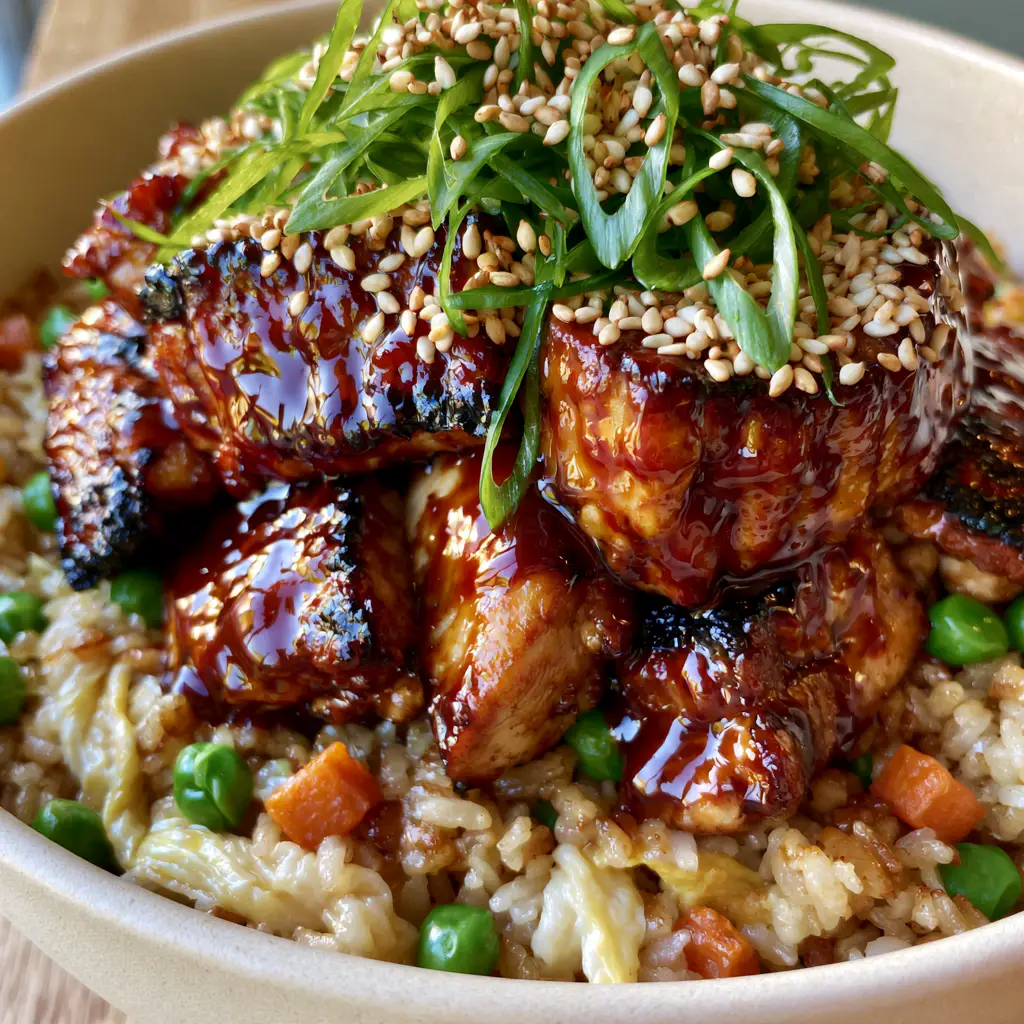
Experience the ultimate fusion of smoky, sweet, and savory with this Japanese BBQ Chicken Fried Rice. This isn’t your standard takeout; we are elevating the humble stir-fry into a gourmet experience featuring succulent chicken thighs bathed in a viscous, dark mahogany Yakiniku sauce. Every bite offers a contrast between the fluffy, golden-brown short-grain rice and the deeply caramelized, charred edges of the seared chicken.
Inspired by the vibrant flavors of Japanese street food, this dish relies on high-heat techniques to create a dewy sheen on the glaze and a perfect “wok hei” aroma. The visual appeal is undeniable, with bright green peas, soft ribbons of scrambled egg, and a dense scattering of toasted white sesame seeds. Whether you are a seasoned home cook or a weekend warrior, this recipe provides the sensory cues you need to achieve restaurant-quality results in your own kitchen.
The Irresistible Allure of This Umami-Rich Stir-Fry
What makes this Japanese BBQ Chicken Fried Rice truly stand out is the meticulous balance of textures and the depth of the Yakiniku glaze. Unlike thinner sauces, this mahogany glaze clings to each chunk of seared chicken, creating a glossy finish that looks as good as it tastes. You can expect a professional-grade dish that hits every flavor profile from sweet and salty to rich and nutty.
- Visual Masterpiece: Deep mahogany chicken chunks contrasted against bright green scallions and golden rice.
- Complex Textures: Tender, juicy chicken thighs with crispy charred edges paired with soft, silken egg ribbons.
- Deep Umami Profile: A foundation of toasted sesame, fermented soy, and aromatic garlic and ginger.
- Pro-Level Searing: Instructions focused on achieving the Maillard reaction for that authentic BBQ flavor.
Essential Components for the Ultimate Japanese BBQ Chicken Fried Rice
To achieve the specific visual and flavor profile described, each ingredient serves a scientific purpose. We don’t just add items for color; we add them for structural integrity and taste. If you’ve enjoyed our Thai basil chicken fried rice, you’ll recognize the importance of high-quality aromatics here as well.
Boneless Skinless Chicken Thighs: 1.5 lbs (680g). We use thighs specifically for their higher fat content, which allows for a hard sear and charred edges without drying out the meat.
Cooked Short-Grain Rice: 4 cups (600g). Essential for that authentic Japanese texture, short-grain rice is slightly more floral and holds its shape better during high-heat stir-frying than long-grain varieties.
Yakiniku Sauce: 1/2 cup (120ml). This thick, viscous glaze provides the dark mahogany color and is typically composed of soy sauce, mirin, sugar, and toasted sesame oil.
Large Eggs: 3 units. These are whisked and cooked into delicate, soft ribbons to provide a creamy textural counterpoint to the seared chicken.
Steamed Green Peas & Diced Carrots: 1 cup (150g). These provide pops of “bright green” and “tender orange” as specified in our visual blueprint, adding natural sweetness and fiber.
Neutral Searing Oil: 3 tbsp (45ml). Use avocado or grapeseed oil; these have high smoke points, which are required to achieve the “blistered” and “charred” appearance without the oil breaking down.
Fresh Scallions: 3 stalks. Paper-thin slices provide a sharp, fresh finish that cuts through the richness of the BBQ glaze.
Toasted White Sesame Seeds: 1 tbsp (9g). A dense scattering adds a nutty crunch and completes the professional “macro” aesthetic of the bowl.
Must-Have Tools for Professional Stir-Frying
Achieving the “realistic dewy sheen” and “caramelized charred edges” requires the right heat distribution. A heavy-bottomed carbon steel wok or a large cast-iron skillet is highly recommended to maintain consistent temperatures. You will also need a wide metal spatula for tossing the rice without crushing the grains, ensuring each one is individually coated in the golden-brown seasoning.
A sharp mandoline or chef’s knife is necessary to achieve those “paper-thin” scallion slices seen in our visual prompt. Precision cutting isn’t just for looks; it ensures the aromatics release their flavor instantly upon contact with the heat. For another great way to practice your knife skills, check out our crunchy Asian ramen coleslaw which also features precision-cut vegetables.
The Masterclass: How to Craft Japanese BBQ Chicken Fried Rice
Phase 1: Preparing the Foundation and Aromatics
Begin by ensuring your short-grain rice is cold and slightly dry. Day-old rice is best, as the starch has had time to retrograde, preventing the dish from becoming mushy. If you are starting fresh, follow our guide for fluffy rice preparation but omit the coconut milk for this specific Japanese profile.
Whisk your eggs with a pinch of salt. In a very hot, lightly oiled pan, pour the eggs in and swirl to create a thin sheet. Once just set, roll the egg up and slice into “soft ribbons.” Set these aside to be folded in at the very end to maintain their delicate texture and bright yellow color.
Phase 2: Achieving the Mahogany Sear
Cut your chicken thighs into 1-inch (2.5cm) chunks. Pat them extremely dry with paper towels; moisture is the enemy of a good sear. Heat 2 tablespoons (30ml) of oil until it is shimmering and just beginning to smoke.
Add the chicken in a single layer. Do not crowd the pan, or the chicken will steam rather than sear. Leave it undisturbed for 3-4 minutes until a “deep golden-brown crust” forms. Flip and cook for another 2 minutes. Pour in 3/4 of the Yakiniku sauce, tossing frequently. The sugars will rapidly caramelize, creating those “thick, glossy, dark mahogany” edges that define the Japanese BBQ Chicken Fried Rice.
Phase 3: The High-Heat Rice Toss
Remove the chicken from the pan and add the remaining oil. Toss in the diced carrots and peas, stir-frying for 2 minutes until the carrots are tender but still have a slight snap. Add the cold rice, breaking up any clumps with the back of your spatula.
Drizzle in the remaining Yakiniku sauce and a splash of soy sauce. Toss vigorously over high heat for 3-5 minutes. You are looking for the rice to take on a “golden-brown” hue and for occasional grains to “pop” or crackle, indicating they are being toasted. This is the secret to a professional fried rice texture.
Phase 4: The Final Assembly and Garnish
Fold the seared chicken chunks and the egg ribbons back into the rice. Toss for just 30 seconds to harmonize the temperatures. The viscous glaze from the chicken will lightly coat the surrounding rice grains, creating a beautiful “dewy sheen.”
Transfer the mixture to a shallow matte cream ceramic bowl. Garnish with a “vibrant” amount of paper-thin scallions and a “dense scattering” of toasted white sesame seeds. The contrast between the dark sauce and the bright garnishes is what makes the Japanese BBQ Chicken Fried Rice a visual triumph.
Expert Tips for a Flawless Result
- The Dry Rice Rule: Never use freshly boiled, steaming rice. The excess moisture will cause the rice to clump and turn into a porridge-like consistency rather than distinct grains.
- Visual Cues for Glaze: Watch the Yakiniku sauce closely as it reduces. It should go from a liquid state to a “viscous, glossy” coating that leaves a trail when you move the spatula.
- High Heat is Key: Don’t be afraid of a little smoke. High heat is what creates the “charred caramelized edges” mentioned in our visual recipe blueprint.
- Season in Layers: Season the chicken, the eggs, and the rice separately to ensure every component has a baseline of flavor before they are combined.
The Best Pairings for Japanese BBQ Flavors
This Japanese BBQ Chicken Fried Rice is a complete meal on its own, but it pairs beautifully with light, acidic sides to balance the richness of the mahogany glaze. A simple cucumber sunomono salad or our street corn salad (for a fusion twist) works wonderfully.
If you’re looking for more protein-heavy pairings, consider serving this alongside a sesame ginger tuna steak or even some crispy fried pork. The salty, savory notes of the fried rice complement almost any Asian-inspired main course.
Frequently Asked Questions
Absolutely. Adding a teaspoon of togarashi (Japanese chili flakes) or a drizzle of chili oil at the very end will add a nice kick that complements the sweet BBQ glaze.
While you can, short-grain rice is preferred for its authentic chewy texture and floral aroma. Long-grain rice will be fluffier but won’t provide the same ‘mouthfeel’ characteristic of Japanese cuisine.
The key is to sear the chicken first at very high heat to develop a crust. Add the sauce only in the final stages of cooking so the sugars caramelize and char rather than carbonize.
Yes, for the best result. Fresh rice contains too much moisture, which leads to steaming rather than frying, resulting in a mushy texture instead of distinct, golden grains.
You can make a quick version by simmering soy sauce, mirin, sugar, toasted sesame oil, and a bit of grated garlic and ginger until it thickens into a glossy glaze.
The Ultimate Japanese BBQ Chicken Fried Rice Recipe Card
Japanese BBQ Chicken Fried Rice with Glossy Mahogany Yakiniku Glaze
Ingredients
Equipment
Method
- Heat a small amount of oil in a pan over medium heat. Pour in whisked eggs to form a thin sheet. Once set, roll up and slice into thin ribbons. Set aside.
- Pat chicken dry. In a hot wok with oil, sear chicken chunks until a deep golden-brown crust forms on all sides.
- Add 3/4 of the Yakiniku sauce to the chicken. Toss over high heat until the sauce is thick, viscous, and the chicken has charred caramelized edges. Remove chicken from pan.
- Add more oil to the wok. Stir-fry carrots and peas for 2 minutes. Add chilled rice, breaking up clumps, and toss for 3-5 minutes until golden-brown.
- Add remaining sauce, chicken, and egg ribbons back to the pan. Toss for 30 seconds until a dewy sheen forms.
- Serve in a shallow bowl. Garnish with a dense scattering of toasted sesame seeds and fresh scallions.
Notes
High heat is essential for the charred mahogany finish on the chicken.
Join the Culinary Conversation!
We hope this Japanese BBQ Chicken Fried Rice becomes a new staple in your weeknight rotation. The combination of the thick mahogany Yakiniku glaze and the perfectly seared chicken is a flavor profile that never fails to impress. If you make this dish, please leave a comment below and tell us how your sear turned out!
Don’t forget to share your creations with us on Pinterest and follow us for more visually-driven, scientifically-sound recipes. Happy cooking!