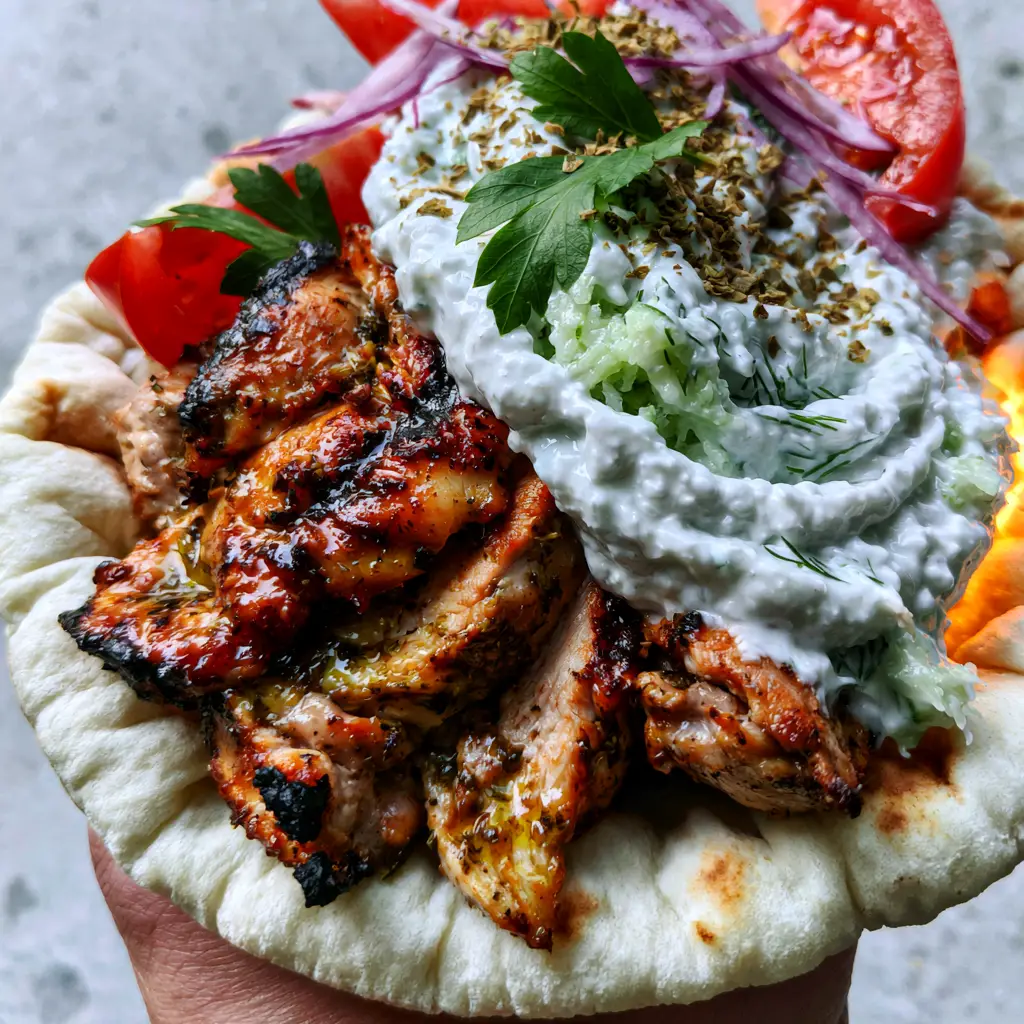
There is nothing quite like the sensory experience of a street-style chicken gyro recipe. Imagine holding a warm, pillowy pita in your hand, its surface dappled with light toasted spots, while the morning light catches the glistening lemon-herb oil sheen on succulent slices of chicken. The aroma of dried oregano and charred poultry fills the air, promising a meal that is both comforting and vibrantly fresh. This isn’t just a wrap; it is a masterclass in balancing textures, from the deep golden-brown charred edges of the meat to the cool, thick crunch of a dill-flecked tzatziki sauce.
Achieving that perfect Mediterranean profile at home requires more than just a seasoning packet. It demands a forensic attention to detail—specifically, the way the acid in the lemon juice tenderizes the meat and how a screaming-hot skillet creates those iconic crispy bits. Whether you are a seasoned home cook or looking to recreate a vacation memory, this guide will walk you through every step of this ultimate chicken gyro recipe to ensure your final result looks and tastes like it came straight from a minimalist Greek bistro.

Why This Specific Chicken Gyro Recipe Works Every Time
- Succulent Contrast: We use boneless, skinless chicken thighs specifically for their higher fat content, which allows for deep searing without drying out the meat.
- Textural Harmony: The combination of thick, textured Greek yogurt tzatziki and crisp, paper-thin red onion slivers provides a cooling counterpoint to the warm, spiced chicken.
- Visual Glisten: A specialized lemon-herb oil marinade ensures the meat remains moist and carries a beautiful sheen that makes the dish pop on the plate.
- Pillowy Foundation: By lightly toasting the pita bread until it develops those signature toasted spots, we create a structural base that holds up to the generous swirl of sauce.
Essential Components for the Ultimate Greek Marinade
2 lbs (907g) Boneless Skinless Chicken Thighs: Thigh meat is non-negotiable here; the fat renders down during the sear to create those coveted charred crispy edges described in our visual blueprint. If you are looking for other protein variations, you might also enjoy our balsamic chicken for a different flavor profile.
1/4 cup (60ml) Extra Virgin Olive Oil: This provides the base for the marinade and ensures the chicken has that glistening finish once cooked. High-quality oil also helps conduct heat during the searing process.
3 tbsp (45ml) Fresh Lemon Juice: The citric acid acts as a natural tenderizer, breaking down the muscle fibers so every bite of the chicken gyro recipe is incredibly tender. It also provides the bright, acidic lift needed to cut through the richness of the yogurt.
4 cloves (12g) Garlic, Minced: Garlic is the aromatic backbone of Greek cuisine. It infuses the meat with a pungent depth that mellows out into sweetness when exposed to the high heat of the pan.
2 tsp (4g) Dried Oregano: This specific herb provides the earthy, slightly bitter notes that define an authentic gyro. We also use extra for a final sprinkle over the assembled wrap.
1 tsp (6g) Sea Salt and 1/2 tsp (1g) Cracked Black Pepper: Essential for drawing out the natural flavors of the poultry and ensuring the Maillard reaction occurs effectively during searing.
Building the Thick and Creamy Tzatziki Sauce
1 1/2 cups (340g) Thick Greek Yogurt: Use full-fat yogurt for the most authentic, luxurious mouthfeel. It needs to be thick enough to hold its shape when swirled onto the pita.
1 large (300g) English Cucumber, Grated: Grating the cucumber provides the signature texture. It is vital to squeeze out all excess moisture to prevent the sauce from becoming runny.
2 tbsp (8g) Fresh Dill, Finely Chopped: Freshness is key here. The dill provides a grassy, anise-like aroma that pairs perfectly with the lemon-herb chicken.
1 tbsp (15ml) Lemon Juice and 1 clove Garlic: These final additions sharpen the sauce and tie it back to the marinade flavors used on the meat.
Necessary Tools for Culinary Success
Heavy-Bottomed Cast Iron Skillet: This is the secret to achieving those deep golden-brown charred edges. Cast iron retains heat better than stainless steel, allowing for a professional-grade sear.
Box Grater: Required for the cucumber to achieve the specific “visible bits” look in the tzatziki sauce. A fine mesh sieve is also helpful for draining the cucumber water.
Sharp Chef’s Knife: You will need this for creating those paper-thin slivers of purple red onion and the delicate flat-leaf parsley garnish. Precision cutting is the bridge between a messy wrap and a visually stunning gyro.
Step-by-Step Instructions for the Perfect Chicken Gyro Recipe
Phase 1: The Lemon-Herb Infusion
In a large glass bowl, whisk together the olive oil, lemon juice, minced garlic, dried oregano, salt, and pepper. Add the chicken thighs, ensuring each piece is thoroughly coated in the glistening marinade. Cover and refrigerate for at least 30 minutes, though two hours is ideal for maximum flavor penetration. This step ensures that the succulent slices of meat carry that herb-oil sheen mentioned in the visual prompt.
Phase 2: Crafting the Textured Tzatziki
While the chicken marinades, prepare the sauce. Grate the cucumber and place it in a clean kitchen towel; squeeze firmly to remove all liquid. In a medium bowl, combine the thick Greek yogurt, the drained cucumber bits, fresh dill, lemon juice, and a pinch of salt. Stir until you see the visible flecks of green throughout the white sauce. Refrigerate until you are ready to assemble the chicken gyro recipe.
Phase 3: Searing for Charred Crispy Edges
Heat your skillet over medium-high heat with a teaspoon of oil. Once the pan is shimmering, add the chicken thighs in a single layer. Do not crowd the pan. Sear for 5-6 minutes per side without moving them; this patience is what creates the deep golden-brown crust. Once cooked through (165°F / 74°C), remove the meat and let it rest for 5 minutes. Slice into succulent, thick strips, ensuring you keep the charred edges intact.
Phase 4: Toasting the Pillowy Pita
Wipe the skillet clean and place the pita bread inside. Toast for about 1 minute per side until the bread is warm and shows light toasted spots. This makes the pita pliable enough to wrap around the generous pile of meat without tearing. The contrast between the pillowy bread and the seared chicken is the hallmark of a great chicken gyro recipe.
Phase 5: The Handheld Assembly
Lay the toasted pita flat and spread a thick layer of tzatziki down the center. Pile the seared chicken thigh slices high. Top with vine-ripened tomato wedges and paper-thin slivers of red onion. Finish with a vibrant sprinkle of fresh flat-leaf parsley and a final dusting of dried oregano flakes. The morning light hitting the wrap should reveal a gentle glow on the sauce and meat.
Expert Tips for Visual and Flavor Excellence
- The Dry Squeeze: Never skip squeezing the cucumber. Any excess water will thin out your yogurt and make the pita soggy within minutes.
- High Heat is Mandatory: If your pan isn’t hot enough, the chicken will steam instead of sear. You want to hear a loud sizzle the moment the meat hits the metal.
- Rest Before Slicing: Letting the meat rest for 5 minutes allows the juices to redistribute. If you cut it immediately, the glistening oil will run out, leaving the meat dry.
- Authentic Garnish: Always use flat-leaf (Italian) parsley rather than curly. It has a cleaner flavor and a more sophisticated look that matches the minimalist style of the prompt.
Storage, Reheating, and Meal Prep
You can store the components of this chicken gyro recipe separately in airtight containers for up to 3 days. The chicken is best reheated in a dry skillet over medium heat to maintain the crispy edges. Avoid microwaving the pita if possible, as it can become rubbery; a quick toast in a pan or oven will restore its pillowy texture. The tzatziki should be kept cold and stirred briefly before serving to re-incorporate any settled oils.
Complementary Dishes to Complete Your Mediterranean Feast
To turn this wrap into a full spread, consider pairing it with a light and crunchy street corn salad for a fusion twist, or keep it classic with a mediterranean quinoa salad. If you have extra chicken thighs, they work beautifully in chicken taco bowls for lunch the next day. For those who enjoy a sweet finish after a savory meal, a simple tanghulu fruit snack offers a delightful crunch.
Frequently Asked Questions
Yes, you can air fry the chicken at 400°F (200°C) for 12-15 minutes, but for the most authentic ‘glistening’ look and deep charred edges, a cast iron skillet is highly recommended.
Lightly mist the pita with water or brush it with a tiny amount of olive oil before heating it in a skillet for 30-60 seconds per side. The steam helps soften the bread, making it easy to wrap.
The secret is using full-fat Greek yogurt and thoroughly squeezing the water out of your grated cucumbers using a kitchen towel. This ensures the sauce remains thick and creamy rather than runny.
Yes! This recipe is packed with lean protein from the chicken and probiotics from the Greek yogurt. By making it at home, you control the quality of the oil and the amount of sodium.
Boneless, skinless chicken thighs are the best choice. They have a higher fat content than breasts, which prevents the meat from drying out during the high-heat searing process required for charred edges.
The Ultimate Chicken Gyro Recipe Card
Chicken Gyro Recipe: Authentic Greek Flavors and Crispy Seared Thighs
Ingredients
Equipment
Method
- Combine olive oil, lemon juice, garlic, and oregano in a bowl.
- Add chicken and refrigerate for 30 minutes to 2 hours.
- Grate the cucumber and squeeze out all excess moisture using a towel.
- Stir cucumber into yogurt with dill and lemon juice.
- Cook chicken in a hot skillet until charred and golden-brown (165°F).
- Layer chicken, tzatziki, tomatoes, and onions on a toasted pita.
Notes
Use a cast iron skillet for the best charred crispy edges.
Closing & Call to Action
Mastering the chicken gyro recipe is a gateway to effortless Mediterranean entertaining. The combination of succulent seared chicken, creamy yogurt sauce, and fresh vegetables creates a balanced meal that satisfies every craving. If you enjoyed this recipe, please leave a comment below and let us know how your charred edges turned out! Don’t forget to share your photos and follow amber_apron on Pinterest for more culinary inspiration.